To create a new, empty data table in progeCAD, simply click either the Table icon in the Draw toolbar
, OR select "Draw" -> "Table" form the progeCAD menu. The following familiar dialogue box will appear:
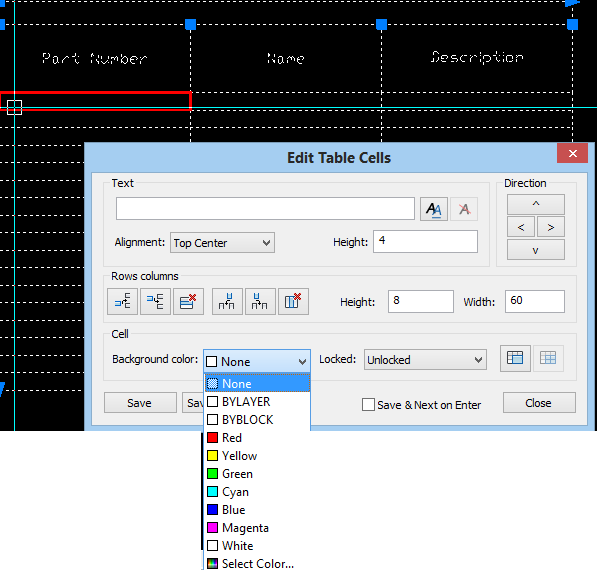
Simply specify the desired number or rows and columns, pick a size for these and set the cell styles. For now we will leave the Insert options as "Start from empty table". Then you can locate the new data table either by a single point, or cross-corner and allow the cell sizes to emerge as a calculated value. Once the table is inserted into your drawing, you can begin entering data, such as naming the headers or inserting values. This is done simply by double-clicking into one of the cells much like we would in Excel. This highlights the selected cell in red and opens up the cell's entry box:
 Note that from here we can easily control many aspects of the individual data cell, like background colour, text height and much more. Text itself can be entered directly here, or formatted in the MTEXT window which can be called up by clicking the "Double AA" icon to the right of the text field.
progeCAD tables also support entity data extraction to a new table, something only supported in the full version of AutoCAD and not in AutoCAD LT. To do this we select the "from object in the drawing" insert option instead. Afterwards we are prompted to select the entities from which we want to extract the data and a template as well, if desired.
progeCAD 2014 also supports an insert from CSV file option as well.
progeCAD is a popular AutoCAD alternative in Australia because of it's low cost, local support and large community of users. For more information on progeCAD 2014 or for a free, no-obligation trial version to test for yourself, visit the progeCAD Australia webpage or contact us at our Parramatta training office.

No comments:
Post a Comment