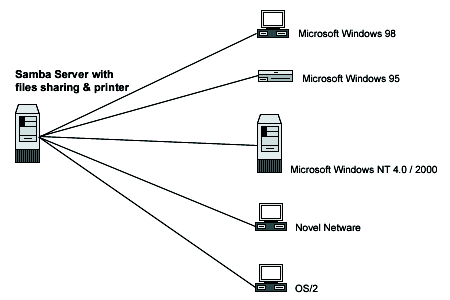
One common network configuration for business file storage and printing is the use of Linux file and print servers on low-cost PC hardware. The advantages of UNIX & Linux servers in an SMB office automation environment are:
- Linux (also some UNIX, i.e. Solaris) is free to download
- Linux is secure, fast and stable
- Linux is scalable and highly configurable
Microsoft Windows, on the other hand, does work very well for supporting graphical end-user applications. progeCAD is a strongly graphical, end-user application for AutoCAD-compatible Computer Aided Design. To connect Windows PCs to a Linux back-office, we use Samba server. Samba is free Linux server software for sharing Windows folders or printers on a network: However, Samba will slow progeCAD's performance if not correctly configured. Samba is packaged for a wide variety of Linux types ("distributions") and installation is best carried out with free packages available for your version of Linux. Here are some more tips for setting up a network USB printer.
Once the USB printer is itself correctly configured by the local Linux printing subsystem (CUPS, LPRNG, UNIX LPR) the printer is then "shared" by its queue name onto the Windows SMB network in the Samba configuration (usually smb.conf, section shown here for Debian Linux - see Samba website for complete configuration details):
[printers]
comment = Sample Printers
path = /var/spool/samba
create mode = 0700
browseable = yes
writable = yes
guest ok = yes
public = yes
printable = yes
use client driver = no
printer admin = root
[My5500]
comment = Demo Example HP 5500 colour (change this with your own printer)
path = /var/spool/samba
browseable = yes
writable = no
guest ok = yes
printable = yes
default devmode = yes
use client driver = no
printer admin = root, administrator
Explanation: Driver configuration can either be client-side or server-side. We strongly recommend server-side drivers (default devmode = yes, use client driver = no) for speed and reliability. Only the Linux administrator is here given permission to "set up" the printer on the server side (printer admin = root). However this creates some challenges. The Windows driver will need to be "uploaded" to the Linux server. We will need to create an additional Samba configuration for allowing this:
[PRINT$]
path = /var/lib/samba/printers
guest ok = yes
browseable = yes
read only = yes
write list = root
admin users = root
create mask = 0644
directory mask = 0755
Once smb.conf is saved, Samba needs to be restarted. A quick network browse of our Linux machine from Windows (i.e. from Windows Explorer type '\\server-name') should list the shared printers and folders on that 'server-name'. NOTE: For security purposes we have only allowed "root" (and administrator) any kind of admin rights to the Samba printers. Our problem is that Windows doesn't have a UNIX user called "root". We get around this by initially connecting to our new shared printer from the DOS / Command prompt as follows:
runas /netonly /user:root "rundll32 printui.dll,PrintUIEntry /p /t3 /n \\server-name\printername" (i.e. \\pc123\My5510 in this example)
You should be prompted for the Linux password for "root", and then prompted whether you want to select a Windows driver at this time - click "No".
A spartan Properties Box for this printer should appear. Click on the "Advanced" tab along the top of the box and click the "New Driver.." button. Select a 'Generic -> Ms Publisher Color Printer' if you want to send Postscript to your Linux printer (this is a good idea, CUPS will automatically reformat Postscript files to something usable by the actual USB printer hardware if correctly configured). Windows should begin uploading the local driver from your PC to the Samba server. Now click the "Apply" button at the bottom of the properties box and you should see several more tabs appear in this dialogue box if everything goes as planned. You may now close this Properties Box.
Because "administrator" is also listed as an admin for our My5500 printer, Windows administrator can make centrally-stored changes to this Samba printer (like setting paper size from Letter to A4, or changing the Postscript mode). NOTE that we have thus far only highlighted steps to configure Samba printers on the server side. Now we can finally add this as a Windows printer by navigating to \\server-name in Windows Explorer, right-clicking the printer and clicking "connect" from the drop-down menu that appears.
This post does not completely cover Samba configuration, only those tips found best practice for printing. We have found the above approach to offer best performance and reliability for printing to Samba server on Linux in progeCAD IntelliCAD (as well as Microsoft Office applications) from Windows. However other procedures may work better for different plotters and we welcome your comments here.


 However, Samba will slow progeCAD's performance if not correctly configured. Samba is packaged for a wide variety of Linux types ("distributions") and installation is best carried out with free packages available for your version of Linux. Here are some more tips for setting up a network USB printer.